

|
Home Online Course Directory Previous Course - 102 Next Course - 104 |
Course 103 - Basic Kite Designs |
|
Today's kites come in thousands of different shapes and sizes. The traditional
triangle design once used by Charlie Brown is still being used today, but modern technology now gives us many different designs
to choose from including box shaped kites, cylinder shaped kites, Bi-planes, Octopus', parafoils, ships ... you name it
and it has probably been designed as a kite and flown. The new variety in kites has made the sport not only relaxing, but
very enjoyable to watch. The colors are beautiful and the designs are amazing. Stunt kites combine modern design with precision control, allowing you to not only launch your kite, but actually control it in virtually any direction you wish. Complicated maneuvers are mastered with practice and when done properly, will amaze bystanders and friends. Power kites are impressive in size and takes the sport of kite flying to the very edge of extreme. Below you will learn what makes each type of kite fit into different categories, how kites are designed, the different components generally found on today's kites, and what makes kites fly. |
|
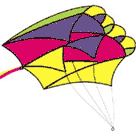
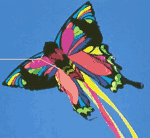
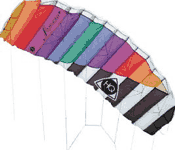
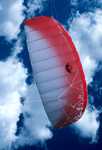
Single Line Kites |
|||
|
|
|
|
|
The above pictures are just a few samples of some of the single line kites
that are available today. Single line kites come in hundreds of different designs and sizes, ranging from
smaller than 1 foot to over 10 feet in size. The design of today's modern kites is better than ever, making
flying your kite easy and trouble free. If you have any wind at all, your kite should be able to fly.
Setting up a single line kite takes only a few minutes, and some are ready to launch right out of the bag.
Tails are not needed any more, but still can be added for that classic look. A simple adjustment on the bridle
connection point backwards will allow your kite to fly stable in light winds and moving the connection point forward
will make your kite more controllable in heavy winds. Once again, all kites are designed differently.
To make sure you have the proper bridle adjustment, check with the information supplied with your kite. Single line kites can be single skin (flat) or ram-air design (double layered with an air pocket). Single line kites usually have a multi line bridle that connects the kite to a single line that the kite flyer hangs onto. Single line kites can have a rigid frame or can be soft without any frame. Single line kites are a wonderful inexpensive way to spend an afternoon with your friends or family. |
|||
|
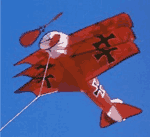
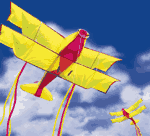
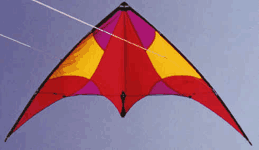
Dual Line Kites |
||
|
|
|
|
Dual line kites are excellent for someone who is looking to get a little more out of
kite flying. With two lines connected to your kite instead of one, you now have the ability to control
your kite in virtually any direction you wish. Dual line kites are easy to fly and easy to launch.
Landing your dual line kite will usually take a bit of practice at first, but can be mastered pretty quickly.
Launching your dual line kite in the air usually only requires a firm tug on the lines and your off. Bridle
adjustments are critical and pre-set at the factory. Adjustments are usually only needed in the event of a
warn or broken line. Line sets are purchased in pre-set set lengths, not on a large roll that you let out as with
single line kites. Dual line kites are designed for either stunt flying for tricks and maneuvers, or for power/traction
flying for buggying, surfing or just to drag you around on the grass. Like single line kites, dual line kites come
in many different designs, colors, and sizes. Dual line kites usually have a multi line bridle that connects to two independent lines that are connected to straps or handles that the flyer uses to control the kite. Pulling on the left line will cause the kite to turn towards the left or counter clockwise, pulling the right will cause the kite to turn towards the right or clockwise. Dual line stunt kites are fast, some of them are capable of reaching speeds well over 50 MPH. Dual line power kites can generate extreme amounts of pulling power and can reach sizes larger than an automobile. Caution should always be used when first learning to fly dual line power kites. |
||
|
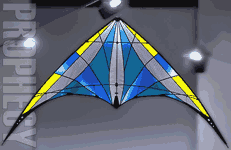
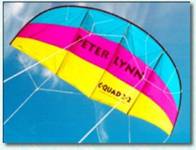
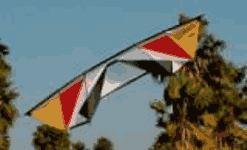
Quad Line Kites |
||
|
|
|
|
Quad or 4 line kites are designed for the ultimate control. The bridle is attached to 4 lines that connect
the kite to the flyer, usually connecting to handles or a control bar. Two of the lines are on the right side and
the other two are connected to the left side in pairs. Upper lines are connected to the top of the kite, lower lines
are connected to the bottom of the kite. The bottom lines are usually referred to as the "brakes" and
can be used to slow the kite down or even fly the kite backwards. By rotating the handles back and forth you can get
precision turns, extreme speed, and superior control as compared to dual line kites. Rotating the bottom of the handles towards you will usually start the kite
flying in reverse, making landing the kite easier than with dual line and single line kites. Spins can be done without
dropping the kite in altitude. Quad line stunt kites give you maximum control, any direction, any time (including upside
down and reverse). Quad line stunt kites like the "Revolution" series can fly inverted (upside down) and backwards with
complete control. Power or traction kites have the same type of control although usually much slower in responding due to their enormously large sizes, and reverse flight is not possible on some designs but still have the brake feature and are capable of landing. Quad line power kites make up for their decrease in speed and maneuverability by generating the greatest amount of power possible, capable of picking up a 250 pound person over 30 feet in the air with very little effort, or pulling a person at speeds over 50 MPH in a buggy or catching extreme air time over 30 feet up and hang times over 30 seconds in length on surfboards and snowboards. Large power kites can be extremely dangerous and should always be flown with the greatest respect and caution. |
||
|
Basic Kite Components and Terminology |
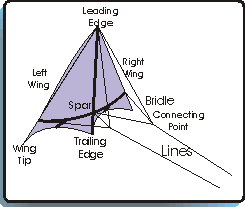 Diagram 3A
click to enlarge 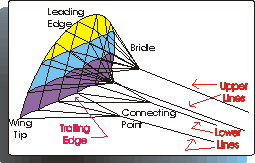 Diagram 3B
click to enlarge |
Diagram 3A and 3B illustrate the common components used in todays kites. The top of the kite is referred to as
the "Leading edge", this is the area that the wind flows over to create the kite's lift. There are many different
types of Leading edges, some examples include a stiff carbon rod stretched across the top of the kite from wing tip to wing tip or
a soft spineless opening used in ram-air foil type kites. The "Right Wing" and "Left Wing" (or sides) are the right and left side
of the kite. An increase in pressure on either the right or left wing will cause your kite to turn or change direction.
The "Wing Tip" is the furthest edge of the right or left wing. Spars are usually stiff carbon, wood, or fiberglass rods
used in the construction of your kite. Most ram-air kites don't use spars at all and rely on the wind and air pockets sewn into the kite
to keep the kite's form and allow flight. The "Bridle" is a webbed network of lines that connect to multiple points on
the kite and allow the kite to respond or perform to the flyer's commands. Bridles can be as simple as one or two lines connected to
a point on the kite or can be as complex as 75-80 different lines connected to multiple points on the kite and joining together at a single or multiple
focal points. The bridle of a kite is one of the most important components. A stretched or damaged bridle can greatly effect
the performance of your kite and can even keep your kite from flying at all. A change in the length of your bridle as little as a
quarter of an inch can greatly effect your kite. Adjustments or repairs should only be done by a qualified person. If you
need to replace a line on your bridle, be extra careful to make the length exactly the same as the previous line. The "Connecting Point"
is the point that your flying lines will be connected to the bridle of the kite. Many kites will have different connecting points
located on the bridle for different flying conditions. One connecting point may be for more power or less wind, another may be for more
speed or less wind. The "Lines" are your flying lines that you use to control your kite. On single line kites,
you will have one line that you either hold onto or is connected to a spool or winder, on multi line kites, the lines will either connect to
a set of straps or handles or a control bar. The "Sail" (not shown) is the material that spans the area of the kite. Sail's
come in many different colors and shapes, and can be a variety of different materials. Some of the newer materials used today include
rip-stop nylon, mylar, or dacron just to mention a few. |
|
What Makes Kites Fly |
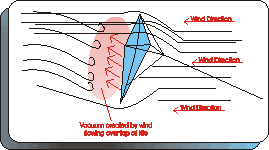 Diagram 3C click to enlarge 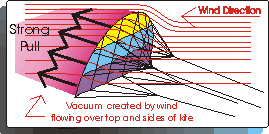 Diagram 3D
click to enlarge 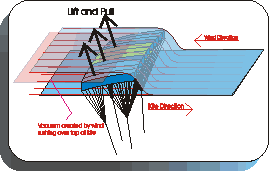 Diagram 3E
click to enlarge |
There are many factors that go into the design of the kite including weight, aspect ratio, angle of attack, bridle points, line length, and of
course, wind speed. Knowing why kites fly and what causes them to do different things will help you in learning to fly. Generally speaking, the larger the kite, the less wind it will take to get it off the ground. This is due to the kite's
"Aspect Ratio". Aspect ratio is a calculated figure that compares the sail area of the kite to the weight of the kite. A very large
kite that has very little weight will have a higher aspect ratio. But why do they fly in the first place? The basic
design of a kite is the same design used in airplane wings. The wind rushes over the top of the wing of an airplane and creates a void
or vacuum of air behind the wing. This vacuum creates a low pressure area and the front or bottom of the wing becomes a high pressure area.
The wing of the airplane is forced and sucked into the low pressure area, creating lift. Kites fly for the same reason, air rushing over the leading edge
of the kite creates a vacuum or low pressure area behind the kite. The kite then tries to move towards the low pressure area and this causes the
kite to lift off of the ground. Power or traction kites create a tremendous low pressure area while creating an enormous
high pressure area in the front of the kite, usually because of the massive sail area incorporated into the design of power kites. Quad line kites
allow the flyer the ability to change the area of the low pressure area by changing the angle of sail of the kite. By rotating the
bottom lines of a 4 line kite towards the flyer (pulling on the bottom lines) the low pressure area moves from behind and above the kite to
behind and below the kite, causing the kite to slow down or stop it's forward motion and even reverse in flight. Diagrams 3C, 3D, and 3E on the left illustrate the wind path and the low pressure areas created by the wind traveling over the edge of the kite. You can click on the picture to get an enlarged view showing more detail. Diagram 3C shows the wind over a single line kite, this is similar to dual line stunt kites as well. Diagram 3D shows the low pressure area created by a single skinned power kite, as you can see the greater the sail area of the kite, the greater the pull. Diagram 3D shows how the low pressure area is created using a ram-air style kite. This design of kite is the closest design to an airplane wing and can generate tremendous amount of pull and virtually creates power as it flies. After this style of kite begins flying, more air passes over the top of the kite. The faster the kite flies, the greater the pull, it virtually creates its own wind once it gets flying, but still requires wind to stay in the air. Ram-air style kites usually have no spines or rigid skeleton and rely on wind trapped inside of cavities sewn inside of the kite to hold their shape. Air flowing into the kite through an opening in the leading edge of the kite will inflate the kite and give the kite its shape. This type of design is great when it comes time to store the kite as it can be folded or rolled up to fit into very small bags. A ram-air style kite when inflated can be larger than a car, but when stored will fit into a small backpack. |
|
Your kite will turn if the low pressure area is increased on only one side of
the kite. Example: By pulling on the left side of your kite, you will cause more air to rush
over the edge of the right side increasing the speed of the right side of your kite, the left side
will slow down and begin to drop and your kite will begin turning towards the left or counterclockwise.
The opposite will happen by pulling on the right side. If your kite constantly tries to turn
to one side or the other, your lines may not equal lengths; or on a single line kite, your bridle may
not be equal lengths on each side. If your kite tries to dart uncontrollably left or right, you
may have too much wind rushing over the bottom or sides of the kite. Changing the angle of
attack (the angle that your kite flies as compared to your position) will change the way wind flows
over the leading edge, giving your kite more stability (the same effect as tying a long tail to the
bottom). This course only covers some of the basics in kite design and what makes kites perform. An entire encyclopaedia could be written on this subject and we realize that we have left out a lot of information. We don't have the time or space to include "everything" about kite physics in these online manuals and just want to brush over the basics. Lets continue onward to the next course and learn about kite lines and why different lengths, weights, and types are so important to kite flying. |
|
Online Course Directory Home |
Kites by Manufacturer

Store Information
Store Hours:
Monday - Friday
10:00 am to 5:00 pm
Phone Number : 702.736.1476
Shop with peace of mind knowing your information is safe!
Site Design by GamelordProductions.com