

|
Home Online Course Directory Previous Course - 105 Next Course - 202 |
Course 106 - Setting Up Your Kite. |
|
Setting Up Single line kites are the easiest to set up. All you need to do is assemble the kite according to the manufacturers directions (if any assembly is needed at all) and then attach your flying line to the bridle connecting point. You can either tie the line directly to the bridle or use a larks head type knot. We recommend the Larks Head over any other type of knot. When you have finished your flying, the Larks Head will allow you to easily un-attach your flying line for storage. To create a Larks Head, make a loop in the end of your line that is about 3-4 inches in length by tying a simple knot. Place your thumb and index finger inside the loop while holding the line with your other hand. Rotate your fingers over the top of the line to create two independent loops, one around each finger. Pinch your thumb and finger together and allow the two loops to come together. Thread the bridle connection point through the two loops and then slowly pull the flying line tight so that the loops tighten around the bridle line. The knot in the end of the bridle will keep the Larks Head from sliding. When it comes time to remove the flying line, simply tug on the tight end of the Larks Head and the line will come loose, allowing you to remove it from the bridle. The diagram on the left illustrates the Larks Head. After attaching your line, simply stand so that the wind is directly behind you, raise the kite into the air above your head and when the wind begins to pick the kite up, hold onto the line and let it fly. Today's kites are advanced in design, you don't have to run to get them to fly (unless you really want to). Your kite should be on it's way to great heights. Let your line out in controlled amounts, too much line at one time may cause your kite to drop in altitude as the kite will move faster downwind and loose lift. Hold the line tight and the kite should begin it's climb once again. Relax and enjoy. |
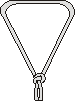   Larks Head Knot |
|
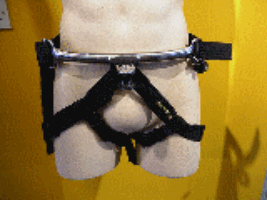
Kite Stakes Dual and Quad line kites are quite a bit different than single line kites. The lines used on these types of kites are usually in pre-set lengths, not a large spool. The first thing you will want to do when setting up this type of kite is to attach one end of the lines to the handles using a Larks Head knot. The line sets are usually marked with two or four distinct colors depending on a dual or quad line set. Generally, there will be a "Red" line and a "Black" line. This is the standard colors for a dual line set. For a Quad Line set, you should also have a "Red and White" line and a "Black and White" line. These are the most common color combinations used, your line set may have different colors or no colors at all. Attach the "Red" line to the right hand handle using a Larks Head (for quad line kites, this would be the top right handle). If you don't have a Red line, use one of the colors you do have and make a mental note of which color is on the right, for no colors at all we recommend attaching one of the lines and then markign it with a colored marker. Attach the "Black" line (or the line that is left) to the right handle. For quad line sets, attach the red/white and black/white to the lower right and left handle positions respectively. Once the lines are attached to the handles, you will want to stake to the ground with a proper sized kite stake. Stunt kites can use pretty much any type of kite stake, power kites could require kite stakes that much larger or more heavy-duty. Staking your lines is the best way we have found in keeping your kite and lines manageable during setup. It also allows you to attach your lines to your kite without having to worry about the wind blowing your kite away while you are setting up. A kite stake can be anything from a small screwdriver, a large heavy duty nail, a metal stake, re-bar, tent stakes, or you can purchase custom made stakes like the one found on the left. Just make sure that the stake you are using is going to be durable enough to hold back your kite in heavy winds. On a two line Kite, simply drop your handles or straps over your kite stake and then begin unwinding your lines while walking downwind as the lines are let out. On a quad line kite, place your handles over your kite stake with the bottom lines (bottom of the handles) closest to the kite stake and the upper lines forward towards the area you are going to set up your kite (either to the side of the wind window or downwind). Separate your lines once you reach the end, placing the Red lines (or right side lines) on the right side and Black lines (or left side lines) to the left. If your lines are not colored you may have to move to the handle side of your lines and walk down the lines towards the un-staked end and untangle them. Once the lines are untangled you can then mark the right side lines with the same marker used on the handle side. If your lines are already marked, it is not always necessary to untangle them before hooking them up to your kite, you can untangle them later by rotating the handles on the other end. Once your lines are completely laid out and separated, you can then begin to set up your kite. Follow the instructions provided with your kite to properly assemble your kite (if assembly is needed). Once your kite has been assembled, hang on to the leading edge of your kite and move it upwind so that the kite is laying on top of the lines. Pick up the bottom of your kite so that the leading edge is facing the ground (this will help prevent your kite from self-launching), begin with connecting the bottom lines (or brake lines) to the proper connection points on the trailing edge of the kite using the Larks Head, then move to the upper lines. On a two line kite, flip the kite upside down so that the leading edge is pointing down to the ground (this will prevent your kite from self-launching), hold it in that position with your body and then simply connect the right (red) and left (black) lines using the Larks Head to the appropriate connection points on the bridle. Once the lines have all been connected, carefully stand your kite up by picking up the leading edge of the kite. The wind should catch the kite and pull the kite lines tight. On a two line kite, slide the bottom of the kite towards the handles so that the kite is standing up, but laying back away from the handles. This will keep the kite from self launching as the wind will force the kite towards the ground. On a quad line kite, you will want to do the same, making sure that the upper lines are longer than the lower lines (due to the way the handles are placed on the kite stake). You can now return to the handles of your kite and begin un-tangling the lines. Sometimes this may take up to 10 twists to get the lines free from each other, other times it may be one or two twists and the lines will be free. With quad line kites, you may have to pass the handles in and through each other to get the lines free, this usually only takes a couple minutes to do. You will want to be aware of the angle of your kite while you are untangling the lines, making sure that the kite continues to lay backwards so that it does not self launch on you. In rare cases on a quad line kite, you may have to undo one of the lines from the handles to get the lines straight, if so, simply place the handles over your kite stake with the top lines laying towards the kite and the bottom lines around the stake, undo the line that is tangled, straighten, and re-attach the line. Once the lines are straight, the kite should be ready for launch. Harnesses Kite harnesses come in many different sizes, shapes, and designs. Harnesses are generally only used for power kiting in addition to buggying, kite surfing, or kite snow boarding. A harness is a device that will attach the kite to your person, allowing your hands to actually let go of the handles for VERY brief amounts of time for putting on your surf board, snow board, etc... or for just giving your hands and arms a break from the power. Attaching yourself to your kite can be an extremely dangerous thing to do. All kite harnesses come with pre-designed ways to allow you to quickly un-fasten the kite from you in case of an emergency. We only recommend that you use a harness that has been tested and proven to be safe, and only purchase one from a manufacturer that is well known in this industry and is aware of the dangers involved. If you are caught in an emergency situation and are un-able to release the kite from you or your harness, you could sustain incredible amounts of injury including death! Power kiting is an extreme sport and can be fatal if not done properly and with constant caution. |
 Kite Stake 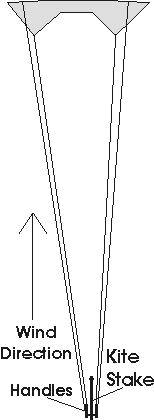 Staked Kite |
|
Today's kite harnesses
are designed with quick release systems, some as simple as being able to lift yourself out of a hook to free the kite
from the harness. Others come with quick release buckles that will release the kite. Whatever
system you choose, make sure you are completely familiar with the releasing system and that it is in perfect
operating condition before you fly. A few basic designs of kite harnesses are the waist harness, the shoulder or mid harness, and the back harness. Some of these types of harness' and accessories are shown below. A waist harness will usually fasten around your waist with straps that will thread through your legs and around your back-side with clips or fasteners. It will usually have a stainless steel bar with a bent metal hook that attaches to a link line that is connected to your kite handles. This type of harness will allow you to pick up your lower body section while pulling down on the handles to release the link bar from the hook, allowing you to free yourself from the kite. This type of harness is most common with kite buggying because it will allow the kite to pull from the lower reigion of your body, the part that is usually directly inside of the buggy. The shoulder harness or mid harness connects around your shoulders and rib cage. This type of harness is a favorite of snow boarders and some kite surfers because it pulls on your upper torso, allowing you to have better control of your board while riding. Shoulder harness' come as sophisticated as a quick release buckle system with nylon straps and stainless steel hooks, or they can be as simple as a reinforced nylon belt similar to a small "weight lifting belt" with lines that attach to your handles. The quick release buckle system will usually only require a pull or push on the buckle system to release the kite, the belt style will require you to lift your arms straight up and allow the belt to simply pull over your head and off of you. The back harness is the preferred harness of kite surfers, it resembles a large "weight lifting belt" and connects with a nylon strap around the waist. The back side is normally quite large, giving extra support to your back, the kite attaches the same way that the waist harness does with a metal type hook. It is recommended that you use a retrieval system for your kite with any harness that will allow you to retain your kite in the event that you have to release it from your control. The most common retrieval system is a bungee type line that connects to the middle of one of your kite lines and is securely fastened to your wrist. In the event that you have to dis-engage your kite from the harness, the retrieval bungee line will keep your kite from flying away, but the kite will not be able to stay in the power. For more information on this type of system, or any of the above harnesses, give our customer service center an E-mail. |
||
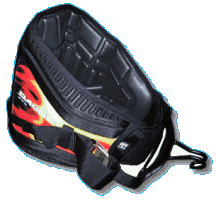 Da Kine Back Harness |
 Da Kine Back Harness |
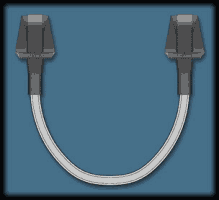 Link Line |
 Waist Harness |
 Warn Waist Harness |
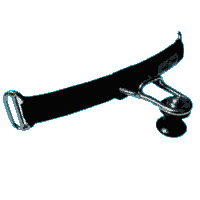 Harness Bar |
|
Lets learn to fly, continue on to the next course and we'll get that kite up in the air. |
||
|
Online Course Directory Home |
||
Kites by Manufacturer

Store Information
Store Hours:
Monday - Friday
10:00 am to 5:00 pm
Phone Number : 702.736.1476
Shop with peace of mind knowing your information is safe!
Site Design by GamelordProductions.com