

|
Home Online Course Directory Previous Course - 203 Next Course - 205 |
||||||||||
|
Bridle Adjustments |
||||||||||
|
Bridle adjustments are an important feature of stunt kite flying. By adjusting your bridle, you will effect
the way your kite performs in a given wind speed. By adjusting your bridle you change the angle of attack your kite
flies at. Quad line kites will usually never need any adjustment on the bridles because you can control the angle of attack
with the position of the handles or control bar. This ability to adjust the angle of attack during flight allows quad line
kites to stall or completely stop in mid flight an also obtain reverse flight. Single and dual line kites have a pre-set
angle of attack and cannot be adjusted during flight like a quad line kite. Single and dual line kites cannot (permanently)
adjust the angle of attack during flight because the bridle settings are fixed to a specific angle of attack - but you can change
that fixed setting to your liking or your current conditions! Getting the proper angle of attack on your kite is essential
to proper flight. Too much angle of attack and your kite may have a lot of speed and some stunts will be very difficult to
perform if not impossible. Your kite could also have difficulty flying in light winds or may not fly at all. Too
little angle of attack and your kite will constantly stall and have difficulty raising or flying. It could also start to
dart back and forth and become difficult to control in heavier winds. Dual line stunt kites require adjustment of the
bridle on a regular basis as the wind condition changes nearly every day. The more you fly in different winds the more
familiar you will be with control of your kite and the easier it will be to get the correct adjustment for your kite in those
winds. Don't worry, adjustments to your bridle are usually very easy to perform and can usually be done in less than a
minute. |
||||||||||
|
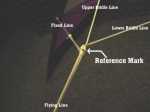
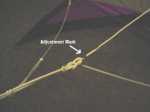
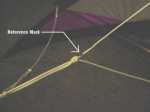
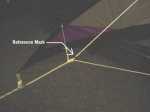
Before you adjust! (Important - please read!) First - Use a marker to place a mark on your bridle lines at the factory position so you will always be able to return the attachment point to the factory position in the event your adjustments get out of hand. This mark will also serve as a reference point to allow for proper adjustment between the left and right bridles on dual line stunt kites. Make sure to mark both sides of your dual line stunt kite before performing any adjustments. Single line kites are the easiest to adjust, simply move your connection point towards the top or bottom of the kite until proper flight is obtained. Usually you will only need a 1/4 to 1/2 inch in adjustment to obtain proper flight. Dual line kites are slightly more complex but still pretty easy to accomplish. The most important thing to remember when adjusting your bridle on a dual line kite is to make sure that the amount adjusted is equal on both sides of the kite. Unequal adjustments on your bridle will cause your kite to constantly veer to one side or the other. Most dual line kites come with a mark already placed at the knot where the bridles join together above the connecting point of your flying lines. If you do not have a mark on your lines or are not sure if there is a mark, simply place a mark on the lines with a colored marker. Always adjust your lines by sliding the knot where the flying line(s) attach. Never adjust your bridle by tying extra knots in the bridle lines as this will change the dynamics of the bridle on the kite. |
||||||||||
|
||||||||||
|
||||||||||
|
Generally, if you find you have to constantly pump your kite to get it to raise in light
wind and the kite acts like it wants to flip on it's back all the time, the kite is stalling to easily and the nose of the kite needs to be adjusted towards you. If you find the kite has
way too much pull in the higher winds, adjust the nose of the kite towards you to spill more air off of the bottom of the kite
and lessen the strain on the sail and frame. If you cannot stall the kite and no matter what you do the kite continues
to fly forwards, adjust the nose of the kite away from you to allow it to stall easier. If you find the kite is flying
too fast and you cannot control the kite, adjust the nose of the kite away from to slow the kite down and spill some of the
air over the top of the kite. If the kite continues to fall forward and you lose all control because the kite is floating
like a piece of paper, adjust the nose of the kite away from you to keep more wind in the sail and make the kite feel more solid. |
||||||||||
|
Advanced Adjustments. Simple bridle adjustments can help you perform different stunts with your kite. By adjusting your bridle a little on the extreme side so that you have a flat kite (tip of the kite adjusted away from you) you will be able to stall very easily. Forward speed will be reduced and you will have a heavier feel on your flying lines. Putting your kite into a fade will be easier as well and will require very little movement. This is a great tip for beginners who are interested in practicing their stalls and landings as well as advanced fliers who are moving onto fades, flick-flacks, and axles. Recovering from those styles of stunts may be a bit more difficult and forward motion will be slower. In heavier winds, adjusting the nose of your kite away from you will also help you with tracking as your kite will fly with a heavy feel on the flying lines, allowing you to perform exact push turns and sharp edges. In light winds, adjusting the nose towards you will allow you to still practice your stunts including floats, lazy susans, wing tip stabs and flap jacks. Flying your stunt kite in light winds is the best way to practice new tricks as the load on the kite is less and crashing your kite is less prone to damage. |
||||||||||
|
|
||||||||||

Home
Kites by Manufacturer

Store Information
Store Hours:
Monday - Friday
10:00 am to 5:00 pm
Phone Number : 702.736.1476
Shop with peace of mind knowing your information is safe!
Site Design by GamelordProductions.com