

|
Home Online Course Directory Previous Course - 204a Next Course - 301 |
|
Course 204b - Putting Away A Peter Lynn C-Quad |
|
Peter Lynn C-Quads are one of the most powerful kites per size - per dollar on the
market today. The power these kites produce is just awsome, my 4.2 meter C-Quad generates more power in
6-15 MPH winds than my 840 Arc and my Skytiger Hi60. My 6.3 meter C-Quad will outperform my Skytiger Hi80
in speed and power and has a pulling power equal to a 9.0 Meter Blade or a 15 meter Naish. Peter Lynn
C-Quads have made their mark in competitions as well and was used to pull a first place trophy at the 2001
Buggy Blast competition at the Ivanpah Dry Lake Bed. These kites out perform most other kites in
almost every way...except when it comes time to put them away. Trying to get one of these kites
back into their bags without knowing how can be similar to wrestling a 300 pound marlin with your bare
hands. This can be an extremly frustrating task. C-quads are more difficult to put away than other foil style power kites because of their rigid carbon fiber leading edge and fiberglass spars. You can't simply roll them up and stuff them into the bag, they must be twisted and folded to reduce their size down to something that will fit into a normal sized trunk. Caution must be used when putting these kites back into their bags. Many people (including myself) have shattered the leading edge, broken a spar, or broken a retaining clip that connects the spar to the leading edge. The first kite store I went into refused to open one of the larger C-quads to show it to me because of the difficulty in putting it back into the storage bag. Since that time, I have purchased 4 more C-quads for my collection and have found an easy way to return these power-monsters back to their storage bags without taking out an eye or shattering the leading edge. |
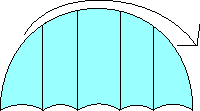 Diagram 204a 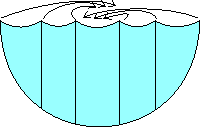 Diagram 204b |
While the kite is still staked, move behind the kite and while holding firmly to
the leading edge of the kite, flip the kite upside down as shown in Diagram 204a and 204b. The leading edge should be on the ground and the spars should be pointing towards the sky. You can then take a couple steps forward to relieve the tension on the lines and bridle. Be careful not to step on the bridle or the leading edge of the kite. Depending on the size of the kite you have, you will have between 1 and 3 spars on each side of the kite. With the kite still in the upside down position as shown in Diagram 204b, start gathering up the right side of the kite starting with the outside leading edge and then all of the spars on the right side of the kite and bring them all together, holding them with one hand. Now gather up the left side leading edge and all the spars on the left side of the kite and hold them with the other hand. |
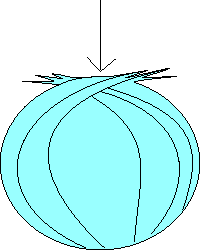 Diagram 204c |
Take both hands and cross them over making the kite into a large circular shape. Stay in back of the kite with the lines and bridle in front. You should be able to now grab the kite in the center at the point as shown by the arrow in Diagram 204c. You should be able to hold onto the leading edge and all the spars with one hand, making the kite very easy to control and manipulate. At this time, you may want to move the kite forward or backwards to make sure the bridle and flying lines are clear and in front of the kite, and not underneath the leading edge or your feet. Keep the lines loose so that you can move the kite around if the winds pick up. |
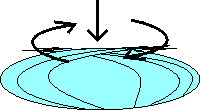 Diagram 204d 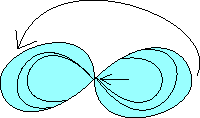 Diagram 204e  Daigram 204f |
Using both hands, carefully and slowly push the point you are holding onto towards
the center of the leading edge on the opposite side while twisting your hands slightly in the direction
shown in Diagram 204d. Make sure that all the spars on both sides of the kite are following the
shape of the outside leading edge and not bowing towards the opposite side of the kite. While you slowly push the kite down, let the leading edge and spars flatten out towards the ground and you will see the kite begin to take the shape of a figure 8. If done properly, the kite should now be laying flat on the ground in the figure 8 shape as shown in Diagram 204e. Your hand should now be touching the center of the opposite leading edge. Grab the opposite leading edge into your hand so that the leading edge is running in the same direction as the spars and wing tips currently in your hand. The kite should now resemble two distinct circles joined at your hand and should not try to flex back open if you lift it slightly off the ground, if the kite does try to open back up, you may not be grabbing the opposing leading edge in the right way. Now comes the tricky part. While holding onto the center point of the kite as shown by the arrow in Diagram 204e, push the right side of the kite down while slowly picking up the center, moving the right wing of the kite underneath and towards the left wing. Keep pushing the two wings together to form a single small circle. The leading edge may flex slightly while the two wings of the kite are brought together. BE CAREFUL NOT TO FORCE THE KITE OR PUT ANY UNNECESSARY STRAIN ON THE LEADING EDGE. The kite should fold up easily and with very little effort. The finished product should now look like Diagram 204f and should easily slide back into the kite bag. After sliding the kite into the bag, pull the opening flap over and seal it with the attached velcro. I will usually slide the kite clockwise while its in the bag so the spars of the kite are not at the opening end of the bag, this makes the bag easier to close and to keep closed. |
|
The Peter Lynn C-Quad is an awsome kite and is always one of my favorites to fly.
These instructions may sound a bit difficult to master and I hope this doesn't deter you from purchasing
a C-Quad. After using this method one or two times, getting these kites back
into their bags is simple and effortless. It is recommended by many to always disconnect your lines and wind them seperately while the kite is in storage. I myself leave the lines and handles attached to the kite while it is stored, keeping them all in the same bag. You can still disconnect your lines from the kite AFTER the kite has been placed into the bag because the bridle and lines will be hanging out of the bag and will need to be gathered up and stuffed in after the kite. If you do decide to keep your lines attached to the kite, you will want to take extra care to make sure the bridle and lines are all facing the same direction...and are all on the front side of the kite when you remove the kite from the bag to open it back up. With the kite being folded up the way that a C-Quad needs to be for it to fit back into the bag, the bridle lines may end up getting twisted around the kite and around each other. In some cases, I have had to undo one or two of the flying lines from the bridle after removing the kite from the bag to straighten them back out. If you disconnect your lines while the kite is in storage you won't have any problem with the bridle getting tangled. Once again, after a couple times of using this method, you should be able to keep the bridle in order with the lines still attached to the kite. Even though I keep the lines attached to the kite, I still remove them from time to time and check the lines for line-stretch. With the massive power generated by C-Quads, line condition and stretch is a constant concern and should be checked on a regular basis. |
|
Online Course Directory Home |
Kites by Manufacturer

Store Information
Store Hours:
Monday - Friday
10:00 am to 5:00 pm
Phone Number : 702.736.1476
Shop with peace of mind knowing your information is safe!
Site Design by GamelordProductions.com