

|
Line Splicing
Many people have asked us how we get those really cool loops in our lines without knots. This is called a splice or knot-less loop that is made
with a Fid. A Fid is a very small "Latch-hook" that you can use to fish through the center of your line and make a splice with. This is a very hard thing to describe to people so we
put together this page to show you a step-by-step method of using a fid to make a spliced loop into your spectra line.
|
||||
|
The pictures below are demonstrations of splicing a loop into a 500# Laser Pro Spectra line. We picked the 500# line to help
show just how the loops look while you are performing the splice. The larger line helps show the braid and texture of the line as it is being spliced.
The line is actually about as large as you would be able to go with the size of Fid that we are using. The Fid's that we carry will splice line from about 70# to 500#.
We also have some Fids that will work for much larger line up to 2500# and more. Some people have spliced 50# line with this kit but is is very difficult to do.
Whatever line you decide to splice, you need to first make sure that the line is a hollow core line. Basically this is similar to a chineese finger trap, the braid of the line goes around
in a circular design so that the center of the line is completely hollow. If the line you have is cross-braided and does not have a hollow center then
this method of splicing will not work. The easiest way to see if your line is a hollow core is to put a clean cut in the end and then scrunch the line
up together (work backwords against the braid) and see if the line opens up in the middle. Look into the center and you should see a hollow tube area.
If you cannot get the center to open up or if you see the braid going through the center to the other side then you may not have a hollow core line.
Click HERE to purchase a Fid Kit.Ok, we got the line, we got the Fid, lets make a loop.
Each picture is "clickable" and will open up another window with the full sized image.
|
||||
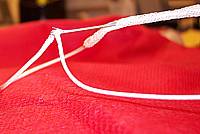
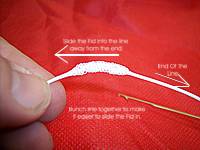 The general rule is 3,3,3. 3 inches for the pigtail, 3 inches for the center and 3 inches for the loop. 3 inches from the end of the line is where you start. Bunch about 3 to 3 1/2" of line together and slide your
fid into the center. You will enter into the line and feed the Fid away from the end and poke it back out again about 3 inches down.
The general rule is 3,3,3. 3 inches for the pigtail, 3 inches for the center and 3 inches for the loop. 3 inches from the end of the line is where you start. Bunch about 3 to 3 1/2" of line together and slide your
fid into the center. You will enter into the line and feed the Fid away from the end and poke it back out again about 3 inches down. |
 Carefully feed the Fid into the center of the line being careful to not snag on any of the strands or to accidently poke it back out. For the strongest
loop, the line must run through the center and not between the braids of the outside shell. Feed the Fid down about 3 inches and then poke it back out of the braid.
Carefully feed the Fid into the center of the line being careful to not snag on any of the strands or to accidently poke it back out. For the strongest
loop, the line must run through the center and not between the braids of the outside shell. Feed the Fid down about 3 inches and then poke it back out of the braid. |
 This shows the fid as it is fed through the center of the line. Now we are ready to make our loop.
 |
||
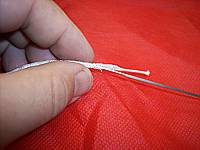
 Grab the line with the hook of the fid about 2 inches from the exit point of the line. Gently work this line back through the center
of the line as you pull the fid back out of the center.
Grab the line with the hook of the fid about 2 inches from the exit point of the line. Gently work this line back through the center
of the line as you pull the fid back out of the center. |
 This is a close-up of the fid hooking the line and ready to pull it back through the center.
 |
 You may have to gently work the fid back and forth a little to get the line started into the center. Continue pulling the line until the fid and
the line are completely out of the hole where you first inserted the Fid.
You may have to gently work the fid back and forth a little to get the line started into the center. Continue pulling the line until the fid and
the line are completely out of the hole where you first inserted the Fid.
|
||
 Here you can see the Fid exiting the starting place and pulling the line along with it.
 |
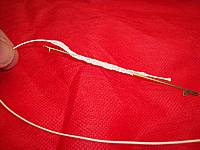
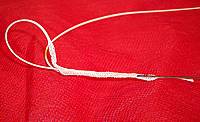
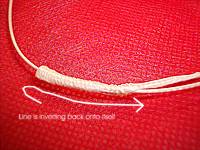
 Here is where it starts to get tricky. Continue pulling the line through the center. You will get to the part where the braid starts to
invert onto itself, continue pulling and inverting the line onto itself until the end pigtail ends up on the opposite end of the loop you are pulling with.
Here is where it starts to get tricky. Continue pulling the line through the center. You will get to the part where the braid starts to
invert onto itself, continue pulling and inverting the line onto itself until the end pigtail ends up on the opposite end of the loop you are pulling with. |
 This is a close-up of the line being inverted onto itself.
 |
||
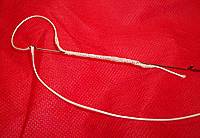
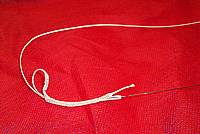
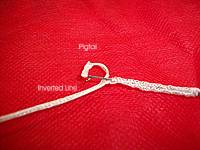
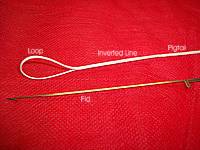
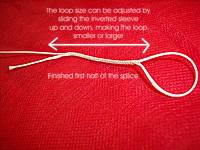 If done correctly, the line will invert onto itself and you will have a nice loop. The pigtail will be on the opposite end than it started and the center
line will slide through the inverted line allowing you to adjust the size of your loop (as well as the overall length of your line).
If done correctly, the line will invert onto itself and you will have a nice loop. The pigtail will be on the opposite end than it started and the center
line will slide through the inverted line allowing you to adjust the size of your loop (as well as the overall length of your line). |
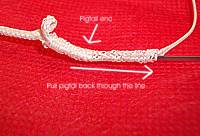
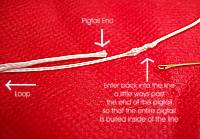 Now to tuck away the pigtail and finish the splice. Start the Fid back into the line at a point that is further then the end of your pigtail. This will make sure
that the pigtail will be completely inside of the line and out of site. Make your entry and then bunch up the line so that the Fid can slide through the
line easily.
Now to tuck away the pigtail and finish the splice. Start the Fid back into the line at a point that is further then the end of your pigtail. This will make sure
that the pigtail will be completely inside of the line and out of site. Make your entry and then bunch up the line so that the Fid can slide through the
line easily. |
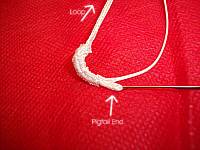
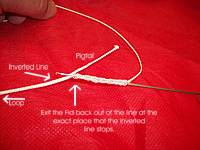 Exit the Fid back out of the line at the exact place that the inverted line stops and the pigtail begins.
 |
||
 Hook the pigtail into the Fid close to the end of the pigtail. Carefully pull the pigtail back into the center of the line as you remove the Fid.
 |
 This shows the pigtail being pulled into the line.
 |
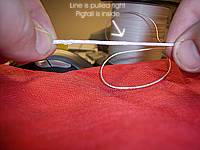
 The pigtail and the Fid are exiting the line. Unhook the Fid and pull the end of the pigtail so it is no longer folded over.
 |
||
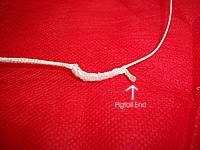 The pigtail is no ready to be pulled out of sight and the splice is almost finished.
 |
 Grab the loop end at the inverted line firmly in one hand and the line at the other end of the pigtail with the other. Carefully pull the line tight
and the pigtail should dissappear into the center.
Grab the loop end at the inverted line firmly in one hand and the line at the other end of the pigtail with the other. Carefully pull the line tight
and the pigtail should dissappear into the center. |
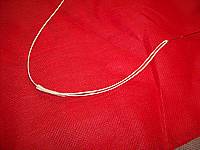
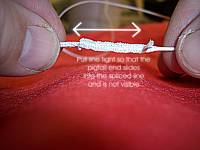
 This is how the line should look after it has been pulled tight again. You may need to massage the line a little to get the weave to lay flat from all
of the bunching. After the braid is tight, you shouldn't notice any big difference in the line at all other than the spliced end will be slightly larger in diameter
and you may have a small double-line area where the pigtail and the inverted line come together.
This is how the line should look after it has been pulled tight again. You may need to massage the line a little to get the weave to lay flat from all
of the bunching. After the braid is tight, you shouldn't notice any big difference in the line at all other than the spliced end will be slightly larger in diameter
and you may have a small double-line area where the pigtail and the inverted line come together. |
||
 This is the finished splice. Because there is no knots in the line you will not lose any of the strength of your line with this type of splice. There is also no large bulky areas that will snag during flight. The other neat thing about this splice is that if you work the splice backwards onto itself again, it is possible to loosen the splice up and pull the splice back out of your line, returning it back to its original factory state. It is very similar to the old chineese finger traps. When pulled tight, it is very strong and will not come undone. When reversed (with some massaging and help), it will loosen up and can be taken back apart or adjusted as needed. |
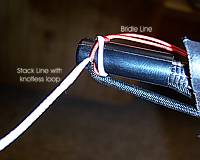 This is the loop larks headed onto a Revolution end cap. This type of loop works great for stacking lines as it is very smooth and doesn't have any knots to snag up on. |
Kites by Manufacturer

Store Information
Store Hours:
Monday - Friday
10:00 am to 5:00 pm
Phone Number : 702.736.1476
Shop with peace of mind knowing your information is safe!